
The Twin Turbo Lexus / Toyota Soarer (1JZ-GTE) owned by Jake Purches.
Book power output 280 BHP 363Nm (at 4800 rpm) or Torque 0 to 60 mph 5.8 seconds and a reported top speed of 170 mph is known.
Are you smoking like a red arrows display team? Or screaming like a
banshee?
Chances are your Turbo charger units are worn out and need re building.
Fear not as this can be done for under a grand, if you follow my tips and
instructions.
As I will explain, I am not a professional mechanic, just a regular DIY type. However it is handy if you have done a head gasket or two, as you need a little experience to be able to undertake this operation. I used some help too, an extra pair of hands are very useful.
So, here is a basic 'words and pictures' guide to removing and refitting the bi turbo assembly on the Toyota Soarer 1JZ-GTE engine.
Twin Turbo refitting and myths exploded!
Well I have learned a few things so far. There is a lot to be gained by doing
it yourself! I removed my turbo's and I have had them refurbished by a turbo re-builder.
They have kept my ceramic wheels and re built the bearings and remade the waste
gates. It was worn bearings that caused all the smoke that my car has been
emitting. Basically oil was escaping into the hot exhaust gas, producing a lot
of smoke, at first intermittently then more often, especially when driving
around town.
The turbines have been rebalanced at 100,000 rpm to ensure that they stay
quiet and to improve efficiency as well as reduce whine.
I had a long chat to a turbo technician, who explained to me the following. He
helped me to dispel any myths that have built up in the club so far regarding
this Twin Turbo Soarer car.
1) The waste gates on my car were cracked around the seats. New valve seats were
fitted and the casing re-machined. For those who don't know what a waste gate is
I will explain - This is a little flap that sit on the exhaust turbine housing
before the outlet manifold. When it is shut hot gas flows from the engine
exhaust manifold through the turbine, there by spinning it, and exits out of the
centre into the outlet manifold. When the turbine picks up speed it is also
turning the compressor blade that then sucks and blows air into the engine,
raising pressure to its set limit. This is simply achieved by allowing some
pressurised air to push on an actuator, a spring loaded piston, that has
attached to it a long rod connected to the waste gate flap. When the outlet
pressure is to the designed limit (about 8 psi) the actuator moves the rod which
in turn pushes the flap in the waste gate open. This then lets hot gas escape
the turbine and exit down the exhaust as normal. This prevents the turbines
spinning any faster and thus prevents over compressing of the engine. Its a
classic feedback loop, and is totally pneumatic/mechanical in operation and is
not electrically controlled. Without this system we would see a run away
situation that would boost to infinity – or blown up the engine which is
obviously more likely.
Now the reason why I will loose boost with cracked waste gate seals is gas will
always be escaping and reducing the boost. It is made worse after the car gets
hot as the different masses of metals involves expand at different rates, making
the matter worse after a hard drive. I understand that its common for people to
report a loss of 2 psi after a good spin. Its usually found it was always to do
with a faulty waste gate.
This is a common problem. I have a noticeable improvement in performance
now it is repaired just for this reason alone. There are two waste gates opening
on one common manifold each controlled by its own actuator on each turbo.
2) The second myth has been going round the club for ages and Iain has mentioned
this in his updated article. The Soarer Twin Turbo is a BI-TURBO. Both
turbo's are identical and have the same mass, are set up identically. They sit
back to back on a common exhaust outlet manifold. The reason they work so
smoothly is because they are small. Due to their small size and low inertia,
they spin up very quickly at low revs. To compensate for there low output, two
are put back to back to give the combined output of a large turbo but with
negligible lag. Each turbo is driven by three cylinders, but both compressed air
outlets join together to make one air supply that pressurises one inlet
manifold. Its really quite simple.
It is known that larger turbo's cannot have the same smooth takeoff as smaller
turbo's, due to increased inertia in larger turbines. This is the familiar 'lag'
that dogs many single turbo cars, diesels in particular as they need very big
turbo's and huge boost to give the punch that is needed. There appears to be a
sacrifice of smoothness to get more boost.
The Soarer excels in its smooth takeoff. When I test drove my car I thought it
was a V8 - I was unaware of a TT model! I just got rid of a Mercedes 350 so I
knew what a V8 feels like. All turbo cars I have tried in the past are delayed
reaction rockets, so it was a big surprise to discover the Twin Turbo Soarer.
The turbo system is delightfully simple, intelligently thought out by engineers
who wanted a car to be as smooth as the V8 but with plenty of whoosh - just what
it does. I think we should remember this when trying to modify it, as it could
be seen as folly to mess with years of research and automotive evolution.
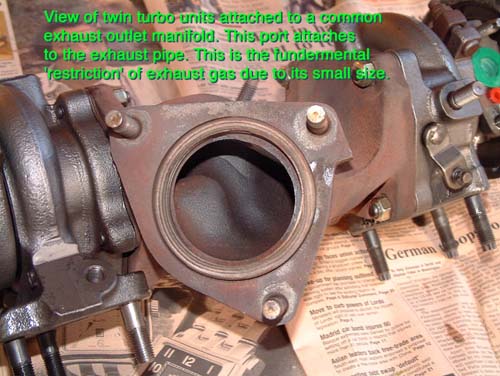
3) The third myth is in power modifications. One of the biggest design
restrictions in the Soarer is not its exhaust pipes, which are already big
enough, or even its intake, but the turbo mounting manifold where the combined
exhaust gas exit to the exhaust system. It is quite small (see picture below).
Any further boosting beyond what is considered reasonable creates more gas to
dispose of. The only way to improve gas flow really efficiently is to redesign
this manifold and make it bigger. THEN large exhaust systems might be worth it
but its unlikely. There is only one exhaust outlet and unless this is converted
to a dual system, not much can be gained. A new exhaust manifold system design
may prove to be the answer. As it is not attached to the engine, but to the
turbo's, then it is possible to change this easily, when a suitable design is
fabricated.
What can be done however is to raise boost by a few psi by attaching small bleed valves on the actuator pipes. This is a simple procedure and the components can be bought in pet shops of all places. The performance gain may in reality be marginal. Over boosting raises the speed of the turbines considerably giving rise to the risk of ceramic turbine failure. I believe the car has a cut out device that cuts the ignition at 14 psi or thereabouts. Of course over boosting can cause stalling due to the back pressure developing in the exhaust outlet manifold - because it is too small to shift the gas.
My conclusion is waste gates should function properly, and most of yours may not
be (as we all have ageing soarers) so get them fixed before you add enormous
exhaust pipes, or tamper with the computer etc, as this will give you a
performance improvement at least back to its original specification.
The biggest restrictor is the back to back turbo mounting manifold. Until this
is redesigned there is not much else we can do to make things better.
When this is done however, and steel wheels put in, then we can expect improved
boost and airflow performance, and also retain the low inertia qualities of the
turbines ensuring good smooth performance from low revs, as we are all used to.
It is also important to stress that the air filter is more than big enough and
contains elements that are designed not to let particles enter the turbo's. A
tiny particle hitting a ceramic turbine at 100,000 rpm can destroy it.
I have no experience with this particular car regarding engine modifications,
but I am of the opinion that an awful lot of money can be spent on tweaks to
gain a few extra horses. The car already produces more BHP per CC of cylinder
than a BMW M3, or a Porsche 928, so is already working very efficiently. So I
won't be wasting money on a 5 inch exhaust system as that is definitely a case
of 'More show than go'.
And lastly because I have had no car for a few weeks I have borrowed and
hired different ordinary cars from a Vauxhall Corsa -not bad for a tin can -to a
Citroen ZX Diesel turbo -very fast for a diesel. But I just can't wait to have
my Soarer back! All is forgiven! So all you boys and girls out there...if you
want more go, just drive your Dad's or a mates ordinary car for a bit and then
get back into the Soarer. The difference is incredible!
This is only intended as a guide and not an explicit reference and no liability is accepted for any inaccuracies. This is photographed step at a time and to quote a Haynes Manual:- "Refitting is the reverse procedure of removing" (not always very helpful if you have forgotten - because I did...!) This should also prove interesting to those who just want to know a bit more about these fancy turbo's they have buried under all those pipes.
So I have produced notes on the actual pictures and kept it simple. If there are any enquiries then you can let me know on jap@mistral.co.uk
I managed to do the whole operation for under £900 all in, including fitting new brake pads and a MOT plus an unexpected o ring repair on the power steering pump. This is a lot better than the £2000 plus quotes I was getting from other firms. After much research, I found that anybody with some engine experience could do it - its not that difficult. My personal experience is a few head gaskets and engine change overs plus suspension rebuilds on Citroen CX's (which are not simple) but I would not call myself a mechanic.
However it is a big deal, and needs careful planning and organising. For one thing you need to be able to allow for more than a week for the car to be off the road, as without turbo's, its not going to move at all. So get all you need BEFORE you disable the car. This might sound obvious but i had to cycle a lot of miles fetching and getting tools etc.
The Turbo's as I explained are a bi-turbo arrangement exhausting out of one common manifold.
The turbo's are quite heavy, about 25 kilos all in.
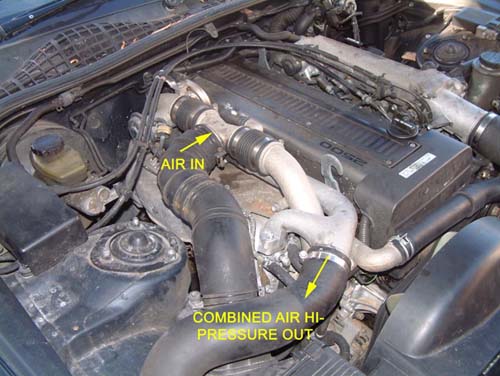
Now lets get back to the beginning. Here is a view of the engine bay. My car is a 1991 1JZ-GTE soarer, and yes it could be cleaner and I am not going to get into that one. Air is sucked in from the filter as indicated and blown out from either end of the unit where it combines and then is ducted rather tortuously around the body frame, under the engine and up to the other side into the injection manifold. Its all rather simple actually. There is apparently an intercooler somewhere but I still can't find it. If its anywhere then it will be in the driver's side wing. These pipes have got to go before you do anything. Thanks to the designers at Toyota, this car is no ordinary car with turbo's stuck on as an afterthought. This is a genuine original design. You will see this when you start to dismantle, as they have put thoughtful alcoves for your hands and knuckles at the back, for those apparently impossible pipes and bolts. Yes you really can get your socket in there, albeit a small one of course. The whole arrangement is very well thought out.
Please remember that this is a well made car and nothing needs to be forced.
First things first with the car in running order, Change the oil and use a good flushing agent. Then put fresh oil in and run the car for half an hour or so and change the oil again. You MUST have clean oil for the new turbo. If the oil is still crappy then do it again. Then change the filter and refill with fresh synthetic oil. The filter can be undone by hand (if a gorilla hasn't installed it in the first place) and replaced hand tight. Filter is located here, just under the dip stick. It might be a good idea to allow the engine to cool as it was frigging hot when I changed it, but I was in a hurry to get it done. (Removing the road wheel improves access to the oil sump bolt if you are doing it on the road)
Start by removing the air filter inlet and the turbo high pressure outlet pipes. They will come off easily and in one unit.
Be sure when fitting not to over tighten as a lot of rigid plastic is used and could crack. Then disconnect the water pipes after emptying the radiator, or you will get a lot of water pouring out all over the alternator. (oops)
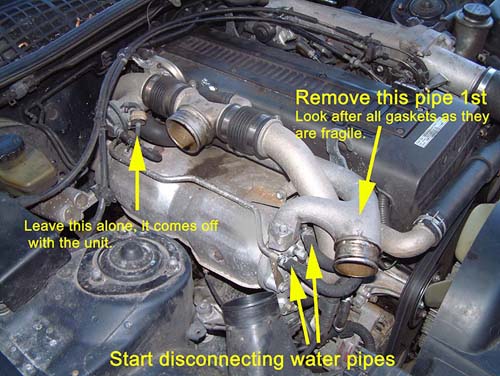
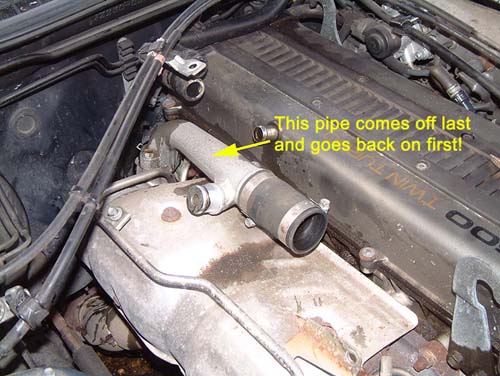
You will find that it all comes apart without much fuss. First undo the jubilee clip on the high pressure pipe that combines both outputs. It is bolted to the front turbo outlet and supported by the rubber hose underneath the inlet tree junction. It slides out reasonably easily. Please note that cold days make rubber very tough and hard. Refitting benefits (especially the hoses) with warming up with a hair dryer.
This might seem obvious but it isn't, as I found out to my frustration. Its almost impossible to get the bolts in to the back charger if this is not rebuilt in this order. I had to loose an hours work taking it to bits again. Do as I say not as I do!
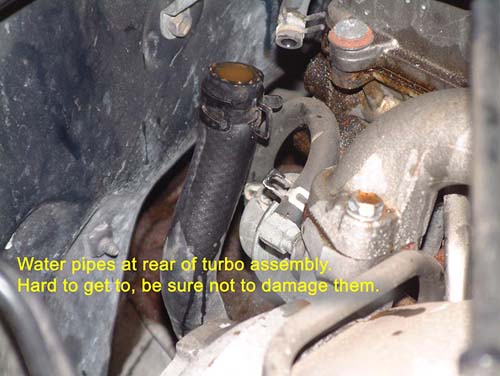
Rear water pipes from the turbo coolers. Not easy to get off, especially when cold. Don't force these off as you won't fancy installing new ones should they split. However with the turbo's removed its all much easier to get too. One can also see the rear turbo actuator that controls the waste gate here too.
Here is a view that shows the heat shield bolts, 4 in total. Remove these bolts and lift off the shield. Then all will be revealed.
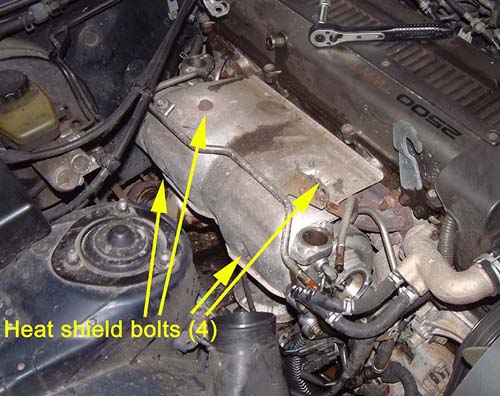
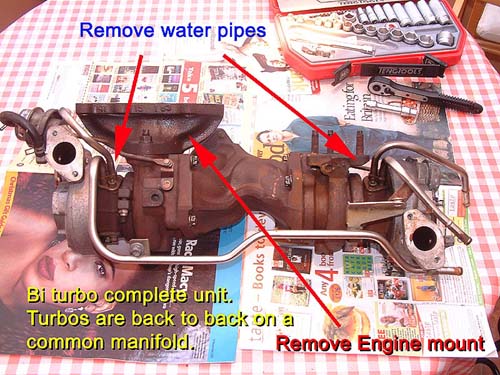
Here you can see properly what the turbo arrangement looks like. One can see it is a Bi turbo arrangement.
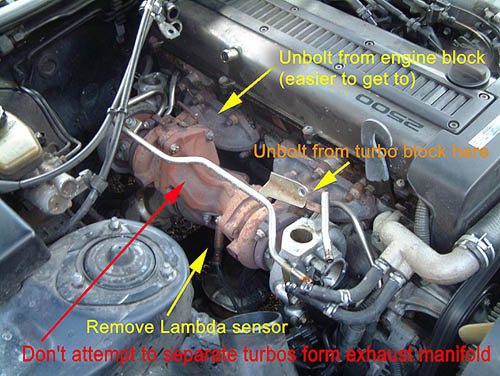
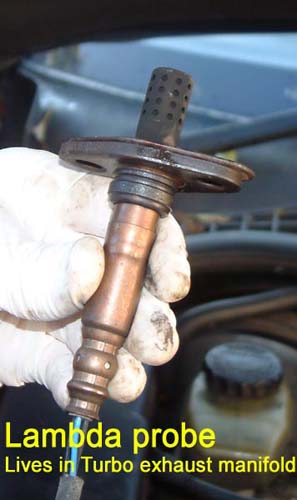
Now its the tough bit, and some help was called for. First remove the exhaust pipe from below and and then disconnect any cables in the vicinity. The Lambda probe (oxygen sensor) lives underneath the manifold. The turbo's are supported by two 45 degree angle brackets and these need to be removed too. These can be accessed much more easily if you remove the engine floor cover and also the road wheel arch gives some access too. Make sure you mark which one is which as they are not the same.
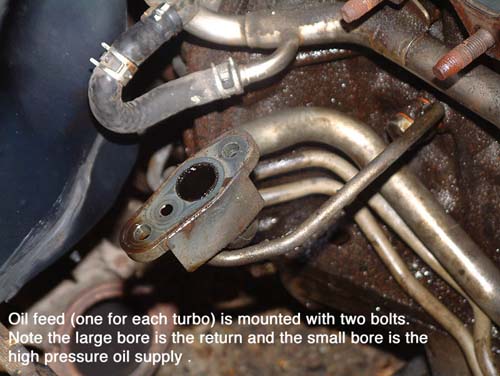
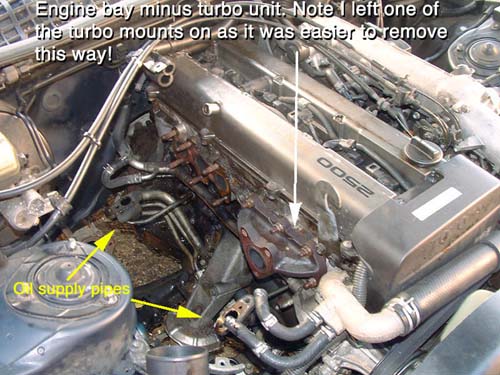
Undo the two bolts that attach the oil feed pipes to each turbo. This is a view after turbo's have been removed. As you can't see much
when the turbo unit is in situ, this should help your 'imagination' to locate them.
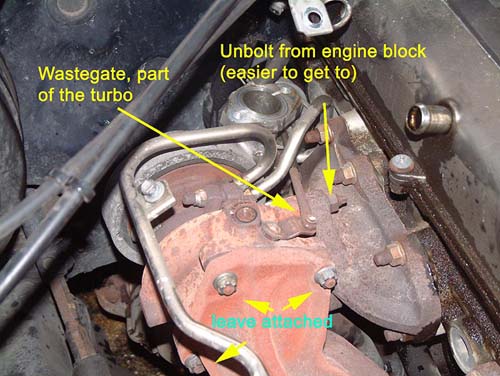
I found it easier to undo the bolts in this manner, directly on the engine block for the back turbo and then the three bolts for the front, leaving the block attached. When all done (took about 5 hours all in) remove the unit in one piece. It was very tough, and you need a lot of patience. Its not easy.
Place the turbo unit on the work bench and have a good look at it.
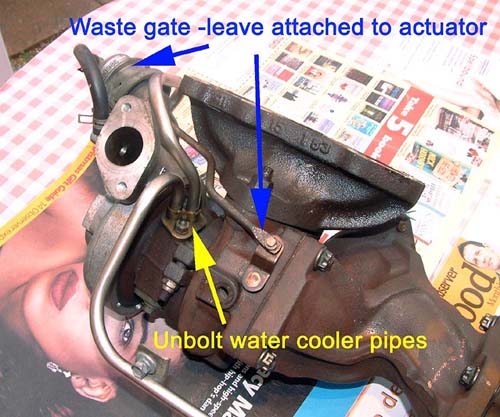
You should remove the water bearing cooling pipes before sending them to Turbo Technics. They will return everything but its not worth the risk. Try acquiring new pipes should they get buggered! However do leave the waste gate actuators on, as they will be recalibrated for you. Other than that leave the whole unit as you see it. You will get new gaskets for the water pipes. There is a stud that is imbedded into the turbo that a bracket is attached to. Turbo technics replaced it but it was too big and I had to source a new one which is difficult as its a fine thread. So try and remove it and keep it safe.
Now when you get them back, all shiny and new, replacement is the reverse BUT before you do, first you must prepare the bearings. First you must disable the ignition, to prevent the car from starting. I did this by disconnecting all 6 ignition leads to the spark plug coils as shown:
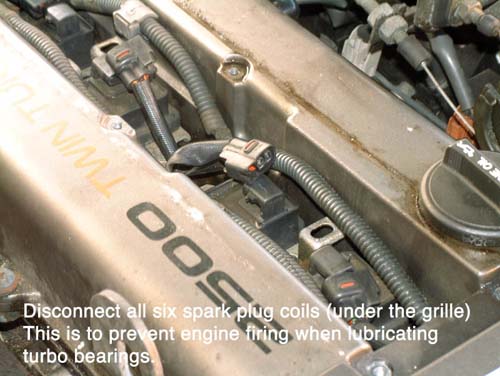
Get someone to hold a pot under the oil pipes that attach to the turbo bearings. Turn the engine over until you get a good flow of clean oil pumping out. Whilst you are at it, drop a few CCs of clean oil into each turbo bearing, to 'wet' it. Then proceed to fit the turbo's back on. (Another 5 hours in my case). When its all fitted back on, and before you re-plumb the pipes, you must turn the engine over on the starter motor for 30 seconds three times, to allow the oil pressure to build up in the bearings. This way you won't ruin the bearings when the engine starts, and cost you ££££s. Check for oil leaks.
Then proceed to fit all the pipe work back together and put the lambda probe back in and make sure all the connections are correct, and the water pipes are all connected. Fill radiator as much as you can, with anti freeze of course - and when you are happy its all back together, start it. I would advise you let the car tick over and reach engine temperature before you try the car out.
After 500 miles of driving, I changed the oil once more. Then remember to change it regularly every 5000 miles at least.
I can't tell you how wonderful it is to get that rush again. And in silence too. Good luck!
Jake Purches
Worthing England.
Many thanks to Jake for this incredibly informative article. Visit Jake's web site in the UK at http://www.thepointnet.com/Lenticular/Turbo/.