REPAIRING SOARER DOOR
HINGES
Thanks to Ian Miller (who supplied the photo's and the copy), here are
all the details you require to repair/re-grease Soarer door hinges.
Be warned, there is NO WAY you can repack the hinges on your Soarer
without stripping the doors from the vehicle.
Can you do this job youself? Yes you can, but unless you have access to
a machine shop, you will need to seek professional help to repair them.
You can strip the doors from the vehicle with the aid of several strong
friends - they do weigh a ton, or should that be tonne! There are about
six bolts that hold the hinge to the car and the hinge to the door. The
hinges are a complex aluminium/aluminum set of castings that would make
an aircraft designer proud.
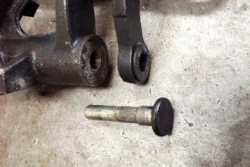 Once
the hinges are off the car, you will discover that there are actually
four hinge pins - two top and two bottom, on each hinge, that need to be
prised out of their housings. They are actually splined and a push fit,
so it should not be too impossible to remove them yourself, with the aid
of a couple of prise bars or similar. Once
the hinges are off the car, you will discover that there are actually
four hinge pins - two top and two bottom, on each hinge, that need to be
prised out of their housings. They are actually splined and a push fit,
so it should not be too impossible to remove them yourself, with the aid
of a couple of prise bars or similar.
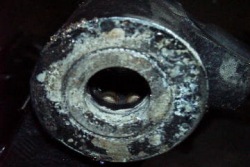
Once you have removed the pins you will see the roller bearing
assemblies. These may be a bugger to get out (my mechanic had to weld a
bolt to the outer hardened bearing cage on the worst bearing to get it
to release). The picture on the right shows a hinge with pin removed.
 The
holes that the bearings reside in actually seem to be drilled right
through, so applications of WD-40 or similar penetrating oils will
remove the grease over time. So will liberal applications from a steam
cleaner (which happens every time a vehicle is shipped overseas to
prevent scary nasties entering your country uninvited)! The
holes that the bearings reside in actually seem to be drilled right
through, so applications of WD-40 or similar penetrating oils will
remove the grease over time. So will liberal applications from a steam
cleaner (which happens every time a vehicle is shipped overseas to
prevent scary nasties entering your country uninvited)!
We found that the LOWER OUTER pins were badly worn on both doors.
We replaced the bearings on the worst worn (the roller assemblies had
actually collapsed) with machined-to-measure sintered bronze bushes, and
welded up the ends of the worst worn pins and machined them back to
tolerance, then regreased all the pins and bearings and refitted them to
the hinges. 
At the same time we stripped and lubed the door stops, each of which
require four smaller bolts to be removed to remove the cover plate on
each side so they could be extracted. 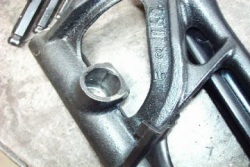 They
were also cleaned and repacked. They
were also cleaned and repacked.
Once again rustling up the help we refitted the doors to the vehicle,
carefully aligning them before tightening everything.
The doors are now back on the car and tight as a drum with no
discernable movement.
A word of warning. DO NOT FORGET to release the door indent plate
(that's the one held with four small bolts) before attempting to remove
the hinge pins.
Failure to do so could be a wee bit dramatic, as the roller ball that
rides UNDER this plate is subject to quite a lot of spring pressure and
the hinge components really do not need the stress!
That said, make sure that replacing the indent plate, roller and spring
assembly is the LAST job on the list before rehanging the doors.
Ian Miller Auckland, New Zealand. October
2001
|
